How to File A Claim on Amazon for FBA Reimbursement
Mistakes are unavoidable when you’re handling millions of items daily. Learn 3 ways to file a claim for FBA reimbursement and which method is the best for you when trying to get your money back from Amazon.
Billions of items are shipped through Fulfillment by Amazon every year.
Even during the height of the pandemic, Amazon reported shipping more than 1.5 billions of items during the holiday season alone.
Imagine billions of items, and how that much volume is processed by Amazon facilities, and you already know that mistakes are bound to happen.
As Amazon FBA sellers, we’ve all been at the receiving end of these mistakes in one way or another. We’ve come to accept that errors are unavoidable even – or especially – in a hyper efficient, streamlined inventory management system simply because it’s operating at breakneck pace. These errors could range from overcharged Amazon FBA fees to lost shipments or damaged inventory.
The bottom line, however, is that these errors cause sellers to lose money.
On the bright side, Amazon knows this and is willing to compensate FBA sellers should issues like these arise. In fact, Amazon often automatically reimburses sellers for mistakes that they detect. But don’t expect them to do so ALL the time.
To guard your business from potential losses and make sure that you get your money back, you have to know how to file an FBA reimbursement claim.
What is an Amazon Reimbursement Claim?
A lot of FBA sellers are unaware that they’re entitled to claim reimbursements should Amazon fail to automatically do so.
Put simply, an Amazon reimbursement claim is a case you file with Amazon to ask for an amount that Amazon owes you. When you do business using Fulfillment by Amazon, you’re paying Amazon to take care of inventory management. So you have a right to submit a claim for refund when issues and errors happen, such as your items get lost or damaged while in their facility or during transit.
You shouldn’t wait long to file your reimbursement case. Amazon allows FBA sellers to submit claims for up to 18 months back, but it’s best to file as soon as you’re eligible to do so and have the evidence to support your claim. The sooner that your reimbursement case is processed, the sooner you can get your money back.
When are sellers eligible to get a refund from Amazon FBA?
Amazon usually issues reimbursements when it deems itself responsible for the loss or damage to the seller’s inventory. As previously noted, Amazon’s system is set up to detect issues and automatically reimburse you for events that fall into the following categories:
Lost or damaged items in an Amazon warehouse of facility
Overcharged FBA fees
Customer returns issues
When Amazon’s system fails, however, it is up to you to actively seek reimbursement and provide the necessary evidence to back up your claims when necessary.
3 Ways to file a claim in Amazon for FBA Reimbursement
There are three ways you can go about with filing your FBA reimbursement from Amazon:
Do it yourself
Hire an Amazon VA or virtual assistant
Use an automated FBA reimbursement tool or software
Which route to take will depend on how much time you have on your hands and how much of an inventory you’ve got.
1. Do It Yourself (DIY) FBA Reimbursement Claim
The simplest and easiest way to file your reimbursement claim is by doing it yourself. This entails downloading reports from Seller Central and then using Microsoft Excel to do a basic reconciliation of your inventory and fulfillment reports.
First, access your Amazon Seller Central account dashboard. Click on Reports and then click Fulfillment.
Once in the Fulfillment pane, you have to click on Inventory Adjustments located in the right panel.
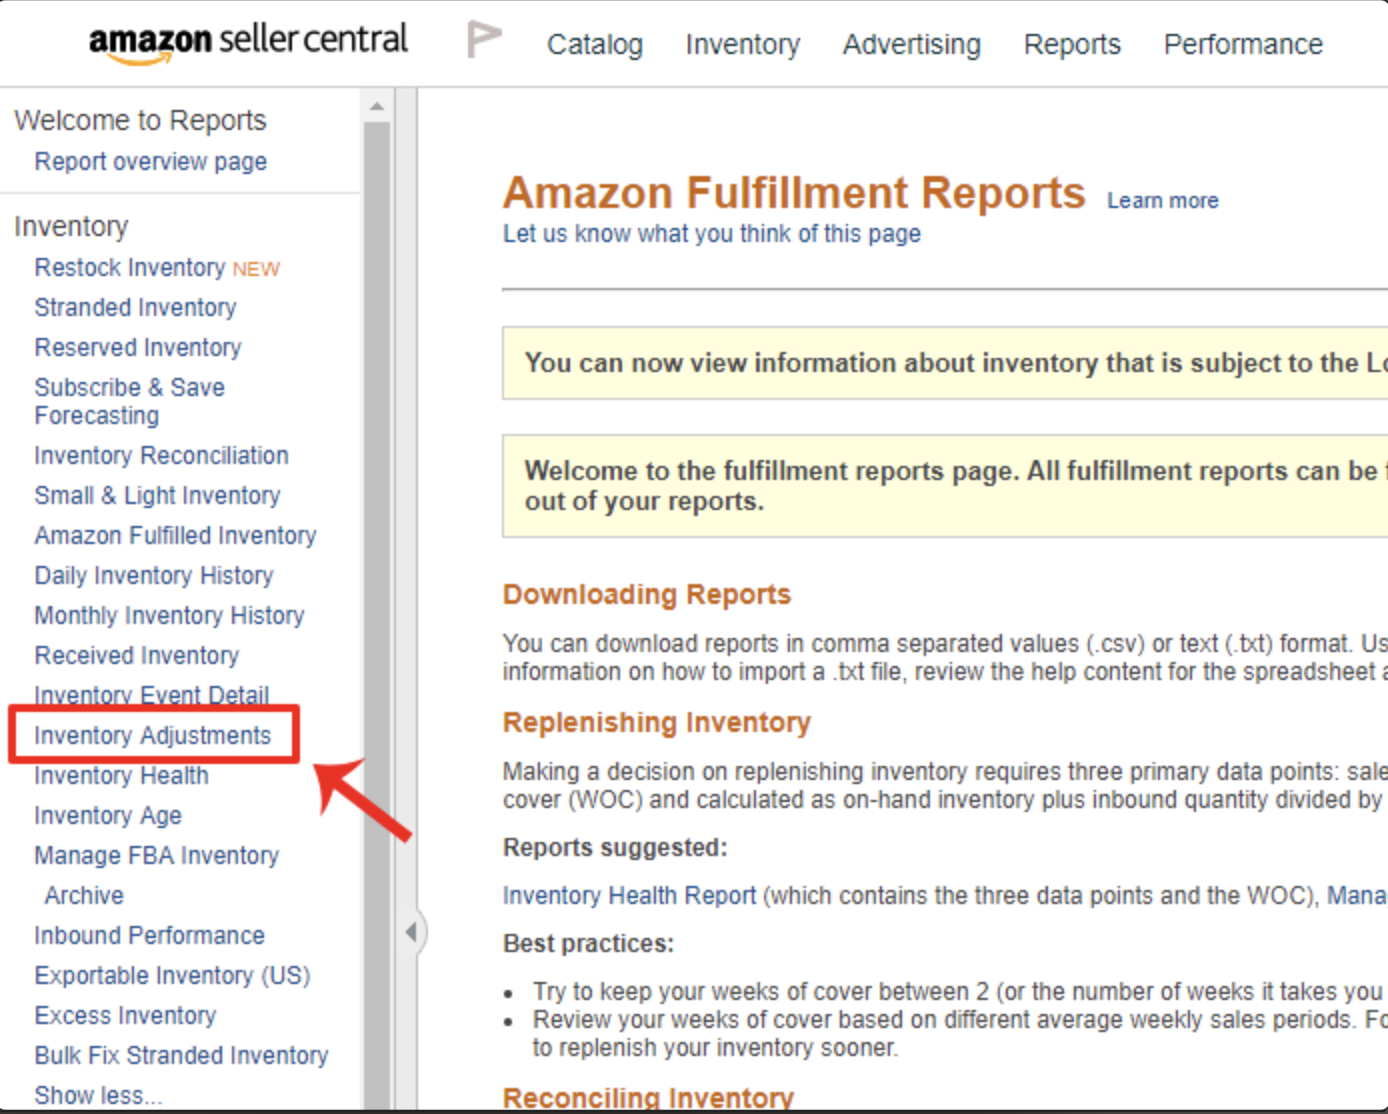
On the Inventory Adjustments window, you’ll see a tab where you can generate a report for an appropriate category (eg. damaged, destroyed or lost inventory). Input the data and choose the date range and then click on Generate Report:

Once you have the needed data, you’re ready to create a ticket with Seller Support to open your case for a reimbursement claim.
The DIY method is great when you’re a beginning Amazon seller who has a lot of time with only a few SKUs in your account. You do need to have at least some data crunching proficiency and a tolerance for spreadsheets if you’re going to do this.
2. Hire a Virtual Assistant
The second way is hiring an Amazon VA or virtual assistant. Depending on the arrangement, you’ll have to pay your VA a fixed or hourly fee. The VA can do all the manual work of downloading the reports, running the Excel calculations, and filing the reimbursement claims on Seller Central.
Hiring an Amazon VA will cost you so this is only advisable if you’re too busy to do the manual process on your own. But if you’re intent on growing your business, having a VA can free up your time that would otherwise be spent on tedious and repetitive tasks.
3. Use an FBA reimbursement tool
The third way is using an FBA reimbursement tool or software to fil. This tool usually syncs with your Amazon Seller Central account and scans it for reimbursement opportunities. This means that you won’t have to do any manual data download or analysis – the tool does this for you.
You have to be careful though, as some tools also automatically submit claims on your behalf. Amazon doesn’t like this practice since it increases the workload on their end and often leads to redundant claims.
Using a tool is the easiest way but it also comes with a cost. Most services operate on a pay-for-performance basis so you only pay a percentage of every successful reimbursement claim. This is recommended for Amazon sellers who have no time on their hands and have hundreds or thousands of SKUs and a very high inventory turnover.
What cases can an FBA reimbursement tool detect?
As amazon sellers ourselves, we’ve tried different tools. Based on our experience, these tools have different capabilities.
Most tools out there, however, have limited capacities when it comes to detecting reimbursement eligibility. It’s for this reason that we designed Seller Repay – it was first created as an in-house software for our own FBA business.
We made Seller Repay as one of the best, most comprehensive FBA reimbursement tool that covers these cases:
Missing From Inbound
Inbound Shipment claims not eligible in the reconcile tab
Fulfilment Fee Overcharges
Fulfilment Fee Reductions
Inventory Lost in the FBA Warehouse
Inventory Damaged in the FBA Warehouse
Inventory Lost/Damaged During FC Transfer
Claims that were partially reimbursed
Customer was Refunded and the Item was never returned after 45 days
Customer was Refunded and sent the item back in Unfulfillable Condition
Customer Returns that were damaged by the carrier or by Amazon and were not reimbursed
Inventory that was destroyed by Amazon
Items that were Damaged during the Inbound Process
Why do I have to pay a commission when I use an FBA reimbursement tool?
FBA reimbursement tools are not for everyone.
If you’ve just started selling on Amazon FBA with only a few inventory, it would make more sense to do a manual claim. These tools are better suited for Amazon sellers who have a hard time keeping up with their huge inventories.
The reason that FBA reimbursement tools charge you for their service is pretty simple: Running and maintaining an FBA refund software also has its costs. The owners also need to pay for hosting, development, and maintenance to be able to provide these services.
The decision to go with tools ultimately depends on how much you value your time. This is what Amazon seller tools such as Seller Repay affords you: more time to focus on your FBA business instead of spending more time than necessary on going after your seller reimbursements. With Seller Repay, you can file a claim on Amazon in 3 easy steps without having to dive into spreadsheet after spreadsheet of data.